
Loading...
Loading...
Loading...
Loading...
Loading...
Loading...
Loading...
Loading...
Loading...
Loading...
Loading...
Loading...
Loading...
Loading...
Loading...
Loading...
Loading...
Loading...
Loading...
Loading...
Loading...
Loading...
Loading...
Loading...
Loading...
Loading...
Loading...
Loading...
Loading...
Loading...
Loading...
Loading...
Loading...
Loading...
Loading...
Loading...
Loading...
Loading...
Loading...
Shift-left testing is an approach to software testing and system testing in which testing is performed earlier in the life-cycle (i.e., moved left on the project timeline). It is the first half of the maxim "Test early and often."
Shift-left testing is important because it helps to prevent the following types of harm due to late testing:
Testers may be less involved in initial planning, often resulting in insufficient resources being allocated to testing.
Many requirements, architecture, and design defects are not uncovered and fixed until after significant effort has been wasted on their implementation.
Debugging (including identifying, localizing, fixing, and regression testing defects) becomes harder as more software is produced and integrated.
Encapsulation (object-oriented programming) makes it harder to perform white box testing and to achieve high levels of code coverage during testing.
There is less time to fix defects found by testing, thereby increasing the likelihood that they will be postponed until later increments or versions of the system, which creates a “bow wave” of technical debt that can sink projects if it grows too large.
As illustrated in the following figure, Agile and DevOps projects have numerous short duration Vs (sprints) in lieu of a single or small number of V as in the previous two examples of shift-left testing. These small Vs would also be modified if one or more early sprints are used to block out the basic requirements and architecture or if test-first and Test Driven Development (TDD) are being performed. The shift-left occurs because the types of testing on the right sides of the earliest of these tiny Vs are to the left of the corresponding types of testing on right side of the larger V(s) they replace. While the following figure appears remarkably the same for Agile and DevOps, Agile testing is typically restricted to developmental testing and does not include operational testing, which occurs once the system is placed into operation. The transition to Agile/DevOps shift-left testing is currently popular and ongoing.
Unlocking the Package Development Model with Unlocked Packages
We previously explored the different development models supported by Salesforce, we are now going to take a deeper dive into the Package Development Model and how, with Salesforce DX and Scratch Orgs, larger size development teams can reap benefits and be more productive.
The diagram above showcases an approach where a large scale development teams with multiple development streams are happening simultaneously. The diagram will be explored in detail below, showcasing how unlocked packages help to isolate changes and provide for a modular approach to promoting change.
Scratch Orgs are small, temporary and personal, this is perfect to support sprint development, ensuring that each sprint begins with a clean slate, automated tests can run with known data, and no one steps on each other.
Leveraging personal Scratch Org instances a development team consisting of developers and quality assurance staff can work together on a feature branch. The feature branch can contain not only DX source code, but also data and automated UI tests. The team can share changes between team members through source control, and GIT is a great SCM to enable this for teams.
QA Engineers can help drive the creation of data to support the development of new features and functionality which can also support validation of user stories through automated UI scripts. Automated UI testing can be run by developers during development to both validate the work they are doing but also to confirm tests are complete and accurate. Collaboration between developers and testers to ensure quality fully automated UI tests and unit tests prove user story completion, not only at the time of development, but also can help considerably to support regression testing with the 3x yearly Salesforce releases, where organizations need to quickly validate the new release and address all issues within a 30-day window.
Testing the deployment of an Unlocked Package is extremely important, not all functionality is covered under metadata under source control and deployment testing will help to catch any functionality missed when using DX based deployments.
Quality is important to any team, and the pull request has become a standard approach to initiate a conversation about the intent to merge code and promote to higher environments. Pull requests are a great mechanism to initiate a quality gate, both through automated tools like static code analysis and manual approaches as a code review.
Real world data volumes and performance characteristics cannot be achieved in a scratch org and need to be relegated to Sandboxes where data limits are much higher and performance is more representative of production systems. Sandboxes are also great environments to use for UAT allowing business users to interact with datasets which more closely represent data they work with on a daily basis.
Quality hooks are part of the git-flow process and tie in linting and unit tests to be automatically performed with each check-in by a developer.
Fortunately, the SFDX provides a number of tools for both linting, security, and unit testing to be introduced into the DevOps pipeline.
The guidance that follows illustrates how to incorporate the items into Azure Pipelines.
Static Analysis In order to ensure quality code, static analysis should performed on all source code. SonarQube and SonarCloud are great tools to help make this happen
Salesforce specific checks are provided by:
Automated Testing All unit tests should be executed for any code written. (Apex) as well as monitor code coverage with each commit
Apex
Unit Tests
Running as part of build: sfdx force:apex:test:run --resultformat human
Resources:
Salesforce DX - CI/CD -
Salesforce CI how-to:
Mocks link
The purpose of this guide is to help traditional application developers transition into the world of Salesforce DX. In traditional custom application development, you control the code, the database and the systems (in the event you leverage continuous integration/delivery) that package up and deploy your application; The good news is that with Salesforce DX, you still largely have all of those same features, they just exist in a slightly different flavor.
Developing in Salesforce is fundamentally different from traditional custom application development in a number of ways. The biggest differences with the advent of Salesforce DX is that the deployable asset that we now move between environments across our Salesforce org is now a package. Rather than manually tracking changes and manually migrating them, (change-set style deployment) we can now build smaller focused components. These components work as a standalone Salesforce DX project, which can be versioned and packaged. These modules contain all of the code, data, and metadata needed for a successful deployment. This document should give you a good understanding of how all of this comes together, making developing in Salesforce DX a much more "developer-best-practices-friendly" environment.
It is important to understand that there are massive and varying scales of Salesforce implementations and that this approach may not be for everyone. This is generally a better fit for large-scale enterprise Salesforce implementations. This approach should be fully understood and carefully considered before establishing it into practice.
Martin Fowler has explored the approach, and for many small scale companies, this approach may be sufficient.
This guide is designed for larger, more enterprise-level teams looking to stand up and support a more complex Salesforce project that would likely benefit from concepts like continuous integration and a more structured, component-based, development paradigm.
Before beginning, it may be a good idea to go through . It takes you through the fundamentals of SFDX, so that you can gain an understanding of the general processes, and terminology that comes with using sfdx.
The authors of this guide are welcome to feedback and have built this from a lack of guidance available.
Please feel free to add or send updates via pull requests.
Salesforce provides two types of non-production environments, Sandboxes and Scratch Orgs. Each fulfills a specific purpose and in the context of this guide will be used in the following manner:
Sandboxes
Limited use for fixed environments ( DEV INT, QA, UAT )
Scratch Orgs
Support all development / dev+test uses
Each type of non-production environment has unique constraints which defines how these are used:
Sandboxes
Sandboxes are refreshed from the production environment, there are limitations on how frequently they can be refreshed, as well as how many can be created.
Scratch Orgs
Scratch Orgs only exist for limited time, can be easily created, but are completely empty when created, therefore any related data must be generated and scripted in.
Development > Scratch Orgs
Assuming a Scrum/Agile approach, development efforts should be short lived, and involve a team including both developers and QA staff. Scratch Orgs marry well with the needs of these teams as it allows developers to work in an isolated environment, and leverage source control as a means of sharing changes with other team members. QA staff can validate changes being made as well as develop automated testing and related test data to exercise the functionality supported in a controlled manner.
Functional Validation > Sandboxes
Once a change is ready to be promoted, confidence that it will work in a production environment is often a requirement. Having an environment that closely mirrors production (including all related data) is important.
Continue on to understand and how to structure these environments.
Official Salesforce Documentation
A key part of the application lifecycle is defining where the code and related assets for development efforts will live, how they will be versioned, and how to support multiple releases across different components (SFDX packages) as well as multiple projects & team members per component. This document outlines specific aspects of those different sections of the ALM and how they all work together to support a seamless CI / CD pipeline. To better build a more complete understanding of how we will leverage GIT and branching, this document has been broken down into three different sections:
Repository Definition / Package Structure
Branching Strategy
CI / CD Integration
The aforementioned topics are interrelated and integral to building an understanding on how to will be leverage GIT for development and release; by the end of this document, you should have sufficient understanding of the process to begin building within the framework outlined here.
Helpful Reference :
Ideally, having short lived feature branches, or even trunk based development would improve deployment throughput.
The branching strategy used needs to map to the maturity, complexity and rate of change incurred in the org.
These 3 factors make a difference:
Maturity:
This is the maturity level of the team and the way change is approached. If the team has mature processes and procedures in place for managing and deploying change, including feature toggles etc and the organization is capable of ingesting changes just as rapidly, then the maturity level is considered to be high. Most organizations will likely be at the low and medium levels.
Complexity:
Anyone reading this guide will likely have a good degree of complexity within the org, how it is managed is something else altogether. Following best practices of applying software architecture principles to salesforce is not an easy task, and will allow for isolation of change and better reuse within the system. Achieving isolation will prove challenging, but not an unachievable goal for any team. An interdependent system will restrict the ability to deploy multiple small isolated changes in arbitrary order.
Rate of Change:
An org that is undergoing constant rapid change has challenges that one that only incurs small changes very infrequently. Rapid change requires more investment in automation and standard operating procedures to insure continued ability to ingest change.
Trunk Based
High
Interdependent
Low
Sprint Feature Branch
Low
Interdependent
High
Feature Branch
Medium
Isolated
High
Strategy
Maturity
Complexity
Rate of Change
Trunk Based
High
Isolated
High
This section walks through the configuration necessary for setting up Salesforce DX for an org using a specific toolset.
Tools / Products Used:
Azure DevOps
Repos - Git Based Source Control
Pipelines - Automated Builds
Boards - Agile Project Management
Automated UI Testing
Selenium
.NET Core
Quality Toolset
SonarCloud
Prettify
ESLint
The scratch org is a source-driven and disposable deployment of Salesforce code and metadata. They are great for temporary deployments, peer review, enhanced test coverage, and automation.
You might spin up a new scratch org when you want to:
Start a new project
Start a new feature branch
Test a new feature
Start automated testing
Perform development tasks directly in an org
Start from “scratch” with a fresh new org
conduct user acceptance testing or to test installations of packages
You can use force:source:push for scratch orgs only. If you’re synchronizing source to another org, use the Metadata API. The push command doesn’t handle merges. Projects and scratch orgs are meant to be used by one developer. Therefore, we don’t anticipate file conflicts or the need to merge.
To push changed source to a scratch org that’s not the default, you can indicate it by its username or alias: sfdx force:source:push -u "Username"
It’s likely that you have some files that you don’t want to sync between the project and scratch org. You can have the push command ignore the files you indicate in .forceignore.
Where to Put .forceignore
Be sure the paths that you specify in .forceignore are relative to the directory containing the .forceignore file. For the .forceignore file to work its magic, you must put it in the proper location, depending on which command you are running.
Add the .forceignore file to the root of your project for the source tracking commands
force:source:push,
Resources
force:source:pullforce:source:statusforce:source:convertAdd the file to the Metadata retrieve directory (with package.xml)
force:mdapi:convert
As we alluded to in the overview, Salesforce development differs from traditional application development. The biggest difference between Salesforce development and your typical custom application development is that in custom application development, the code repository is always the source truth. With some recent changes released in Salesforce DX, you can begin to develop in a similar fashion. However, before we get ahead of ourselves, let's detail what's available from a development model perspective in Salesforce today. Salesforce supports three development models and each of these models places a different focus on the source of truth.
Org Development Model
Source of Truth = Production Org
Change Set Development Model
Source of Truth = Combination of Metadata in the environment and last build of the changeset
Package Development Model
Source of Truth = Metadata in the Package Project (VCS)
For larger and more complex Salesforce development efforts, it's easy to imagine a team of 5-7 developers working away on a given feature set - with each developer touching a different portion of the application. Now imagine that same circumstance in each one of the models outlined above. It's easy to see that keeping track of changes across an active team of seven developers and moving those changes through environments manually could quickly become an unruly, tangled mess. When you get to this scale or larger, you'll likely want a more regimented approach that supports well-established software development best practices like test-driven development and continuous delivery; and the only model that currently supports this is the Package Development Model.
As an added bonus, the package development model supports the concept of modular development within Salesforce, allowing you to break apart large sets of functionality into smaller packages for smaller scoped and more controlled change management. We plan to explore this topic in-depth, but before we go any further - if you have questions or are unclear on Salesforce DX packages, or the different Salesforce development models and need more information, we suggest you investigate the resources listed below - as these concepts are foundational to the approach set forth in this guide.
Trailhead Modules:
Running a Salesforce Org requires a team effort, and will likely require team members to take on different responsibilities to be successful. How the team takes on and distributes these responsibilities may differ but is important that there is coverage allowing coverage to support staff vacations and transitions.
Business Admin Liaison
Responsibilities
Provides support for business staff wishing to make minor changes to the system on their own with development support assistance
May evolve to allowing more advanced business staff to make changes in a dev environment, and reviews and guides changes and handles promotion of changes forward.
Resources
Integration Liaison
Responsibilities
Reviews external connections to the Salesforce environment ( all API integrations )
Incoming and Outgoing
Business Change Review
Responsibilities
Reviews requested changes requested by business staff or partners
Works with Salesforce Software Architect Direction resources to ensure alignment
Salesforce Change Management
Responsibilities
Prepares for 3x annual Salesforce releases
Reviews all published documentation from Salesforce regarding releases
Software Architectural Direction
Responsibilities
Reviews proposed changes to the systems prior to implementation to ensure alignment
Runs software architectural review sessions prior to sprint work beginning
Site Reliability Engineering
Responsibilities
Metrics Collection, Publishing and Rate Limiting
Responsible for managing storage and costs involved in running this service line.
Responsibilities
Source code repository and pipeline Management
Add new repos and pipelines for unlocked packages as needed
Data Engineering
Responsibilities
Ensures data is cleansed when sandboxes are refreshed with production data
Reviews SOQL/SOSL queries
Front End Engineering / Lightning Web Component
Responsibilities
Reviews approaches taken for front end development and ensures quality and standards are met in respect to LWC and Javascript development
Build, maintain, evangelize and publish software architecture standards for front end engineering
Access Control Management - Roles, Profiles and Object Permissions
Responsibilities
Ensures proper access to data and security
Code Quality Management
Responsibilities
Maintain automated checks for pull requests
Ensure Unit Tests Pass and Code Coverage % Requirements (currently 75%)
Automated UI Test Development
Responsibilities
All custom functionality in system needs to be covered by automated UI testing
Ensure automated UI tests are developed alongside functionality during a sprint
Test Data Management
Responsibilities
Ensure proper data coverage for all functionality and breaks up appropriately to align to Unlocked Packages
Data coverage needs to address use cases as needed to prove user story succeeds (positive/negative testing etc)
Security Testing
Responsibilities
Monitors code and configuration from a security perspective
Employs, configures, and runs reports with toolsets for monitoring security on platform
Work with Software Architect to maintain with Technology Roadmap
Ensures approach for integrations adhere to best practices
Define best practices and maintain on GitBook as part of guidance.
Works with Salesforce Software Architect Direction resources to ensure alignment
Develops frequency/volume quotas and works with SREs to monitor them
Determines if fan out approach (Custom APEX) or Enterprise WSDL would be most appropriate
Determines methods for monitoring health of APIs and proper error conditions
Works with Integration team
Understands how system outages are expected to impact the Salesforce system and how to properly handle scheduled external system downtime
Resources
Determines high level strategy for approach to implementation and impact to systems
Works with Business and Technical teams for clarity
Resources
Audits environment to highlight areas of possible Impact
Runs point on all tickets that need to be created with Salesforce in support of releases
Works with PMO to describe impact to systems and helps to define resources needed to resolve
Builds Process for handling releases
5 Weeks ahead of release - Review Finalized Release Notes
4 Weeks ahead of release - Stand up Preview Sandbox, Full regression is run with preview
4-2 Weeks ahead of release - bug fixes / changes related to release are implemented and tested
1 Week ahead of release - all changes finalized and released into production in advance of release (if possible)
Release weekend - Monitor system throughout release
Develops technology roadmaps
Understands strategic initiatives
Reviews Salesforce technology roadmaps and:
Identifies alignment of salesforce technology to initiatives
Identifies customized features that are becoming platform features
Reviews all 3rd party components/modules used in the system
Develops life cycle for turning on/sunsetting these items
Works with Enterprise Architecture Team
Works with team to develop guidelines for Unlocked Package Strategy, reviews boundaries for each unlocked package proposed, and regularly audits unlocked packages to ensure they only contain what is expected.
Resources
Andrew Fawcett
Determines data to be collected, defining granularity and frequency, determines how data can be summarized
Continually:
1) start very high-level
2) get in the wild
3) monitor
4) review with team and adjust accordingly.
Continually adapting and optimizing granularity and frequency.
Builds logging budgets (storage) and ensures applications operate within budget limits
Reviews all budgets to understand overall cost
Determine normal operating constraints for metrics, develop alerting and means of publishing and notification of proper staff when out of range.
Monitor systems for outages, interruptions and service degradation
Monitors systems against governor limits and Salesforce enforced thresholds (API Limits etc)
Warns when system is close to exceeding expected boundaries
Maintains quotas for limits, gets insight if quotas are breached and discusses with appropriate team members
Works with Salesforce Team and Business to develop run-books for system issues
Builds and maintains APM stack or other logging/monitoring platforms and tools
(After approval from Software Architecture)
Manage code reviewer sign-off assignment
Asset management (develop & document policy/strategy)
Secrets management (develop & document policy/strategy)
Branch management (develop & document policy/strategy)
Manage permissions / policies / extensions
Administer code promotion from Scratch Org to DevInt > Test > UAT > Prod Sandboxes
Participate in change management process
Unlocked package versioning
Participates in release management meetings
Monitors the DevOps toolset feature releases, communicates changes to team.
Develops team onboarding materials for DevOps
Define best practices and maintain on GitBook as part of guidance.
Reviews object design
Define best practices and maintain on GitBook as part of guidance.
Ensures systems are backed up
Reviews data limits
Maintains enterprise data dictionary
Resources
Data Engineering Starter Kit Trailmix
Ensures unit tests (Jest) are integrated into build pipelines [Details]
Ensures JSLint/JSHint and other tools are integrated into build pipelines and are accessible to development team - define and leverage tools to maintain minimum quality standards and document on GitBook
Static Code Analysis Rule-set Management
Adherence to Naming Conventions / Styles
Adherence to Architectural Conventions
Adherence to Unlocked Package Guidance
Security Checks
Work with Security Team to Review and ensure alignment with organizational
Build, Maintain, Evangelize and Publish Software Architecture Standards for the organization
Manually review pull requests for adherence to Software Architecture Standards
Maintain documented code review process on GitBook
Ensure data alignment with automated UI tests and Unit Tests.
Deliver data within the context of a sprint to support feature development/modification.
Responsible for overall quality of test data in Sandboxes and Scratch Orgs
Automate the generation of test data where possible
Identify and implement tools/approaches supporting data generation
Old Approach [DETAILS]
Newer Approach - Forceea []
JQ is a great utility to work with JSON
Works with security team to ensure adherence to security standards
Looks for OWASP top 10 and other security issues
Works with developers to develop remediation plans
Maintains a risk register
Resources
It is important to get your org in shape prior to making the move to Source Driven Development.
Salesforce requires that you write unit tests, and it is extremely important to make sure they are well written so you have the confidence that functionality works as expected. Taking some time to review your Apex tests to ensure they cover both positive and negative scenarios is a worthwhile investment of time.
This is a great tool tool check out your org for potential issues lurking in your code. While it's always important to keep after the security of your org, running this tool and tightening up security is a great next step.
Security Health Check - Trailhead
Anyone new to Salesforce will benefit by getting to know Trailhead. The following Trailhead Trailmix is a great start for anyone to get familiar with the platform.
Developers regardless of experience level would benefit by going through some of the content on Trailhead. The following resources are put together to help developers learn the concepts explored in this guide.
Trailmix (start here!)
Zayne Turner's Excellent Salesforce Series
With Quality Assurance being part of the sprint, the focus has shifted from finding bugs to delivering quality, and building test automation can be a responsibility shared with developers.
David Louvton
Selenium at Salesforce Scale ( | ) (audio is choppy but content is great)
(5 part series)
(4 part series)
Andrew Fawcett's posts:
Leverage Page Object Model
Create / Refresh Test Data
Test Automation - Create/Reset Test Data: This document depicts the complete end-to-end flow of the data creation and resetting to utilize the data as part of test automation and execution in Scratch Org in SalesForce. The "Data" folder will be created upon creation of the unlocked packages(Future state) and therefore the team can able to create the data for each feature component and host in JSON format in the "Data" folder. The process of consuming the test data has been documented below.
Create and place the data in JSON format for each business feature in "Data" folder of the Master Branch.
Create a repository of the "Feature Branch" from the Master Branch.
The "Feature Branch" should have the following folders present. a. Function Automation Folder - Where the functional test automated scripts(using Selenium) reside. b. The "Data" folder where the test data resides in JSON format for each business feature.
Create a Scratch Org in SalesForce.
Copy the "Featured Branch" into the Scratch Org.
Develop/Update the test automated scripts for the "Featured Branch" in the Scratch Org by utilizing the test data from the "Data" folder for all the business features required.
Copy the updated scripts and data from "Feature Branch" to the "Master Branch" using the SFDX pull request.
Ignore the "Functional Scripts" and "Data" folders by mapping the folders path in the .forceignore file in Git before deploying into the DEV, QA and UAT sandboxes.
When working with package commands, it's not unlikely to run into errors and issues. Here is a compilation of common errors that may occur, along with solutions to those errors.
The package ID or Alias ID is invalid OR The subscriber version ID or package version ID isn't defined
The package version ids may be specific to a DevHub that does not allow them to be installed in another company's environments. This can happen on open source projects where the package IDs and version IDs are listed in the packageAliases section of open source SFDX projects
To fix this, you would need to remove all of the IDs of packages and versions you have not created, and re-package them for yourself. Add your own IDs to the local sfdx-project.json
"Package" isn't defined in the sfdx-project.json. Add it to the packagedirectories section and add the alias to packageAliases with its 0Ho ID.
Same problem as above. Your own DevHub doesn't recognize the packages that were created and versioned in another DevHub
It's possible that the package was created on a different Dev Hub. Authenticate to the Dev Hub org that owns the package, and reference that Dev Hub when running the command
Same as problems from above. You have to recreate all of the packages from your own DevHub, and reference those IDs only.
This Directory does not contain a valid Salesforce DX project
This happened if I tried to edit in a path that wasn't correct. Sometimes, when I opened a project, VSCode would open up the repo without the correct path. To fix this I just did "cd .\InsertFolderNameHere"
Always double check that you are working in the path where your SFDX project is located
Path must be a string, received null
It fixed itself when I edited the contents within the package directory folder, and then restarted VScode.I assume it's because a path is considered empty / doesn't have enough contents for a proper package.
Expected path
This error occurred when I tried to version a package, and the path I referred to was different than the path in the sfdx-project.json file. It has to be exactly the same. I refereed "./forceapp1" in my command, however, in the file, it was just "forceapp1" without the "./"
Package Root directory empty
This occurred when I created a package, and the folder for the package directory was empty. When I created an empty file inside of the directory and entered in a few random lines of cold, the error went away.
Code promotion is an essential activity in a development effort; having a well-documented approach to promote code after inspection and deemed ready to move to production can yield higher team throughput. There are often a few steps along the way between development and production; this guide provides prescriptive guidance into what these could mean for your organization before reaching production.
Individual Scratch Org
This is where all the work happens; each developer and quality assurance engineer works within their own individual Scratch Org. Developers concentrate on developing unit tests and adding/modifying functionality. Quality assurance engineers can develop automated tests and collaborate with developers in fabricating data to support functional changes.
Integration Scratch Org
Once a team including both developers and quality assurance engineers feel confident a change is ready for testing, they move the updated package to an Integration Scratch Org, the act of moving the package to this Scratch Org helps test the deployment process and may uncover issues that the team can resolve. Quality assurance engineers can gate this environment preventing changes from moving forward until the quality meets organizational standards.
Integration Sandbox (Full Sandbox)
This environment is a short-term stop, meant to test the package in an environment that closely resembles production, and is meant to uncover installation errors. Lightweight automated browser testing is run here to ensure that the installation works without issues with production data.
Quality Assurance Sandbox (Dev-Pro Sandbox)
This environment is meant for full integration testing by the QA team, involving both automated and manual testing.
User Acceptance Testing Sandbox(Partial-Full Sandbox)
This environment is meant to demonstrate the functionality to key business stakeholders and end-users to confirm all functionality exhibits expected behaviors.
Production
Once in production, the package should work as expected and if not, should be easily reverted to the prior version.
After you convert from source format to metadata format and package metadata from one org, you can release your app in a different org. You can install this in production with force:package:install. You can specify tests to run after deployment and indicate whether to roll back the deployment if there are errors.
sfdx force:source:deploy
Takes ‘things’ that are in DX format and sends them to an org without the requirement to test anything. It does not provide the ability to roll back the changes if they would not work, it just sends the data, overwriting existing things without regard.
Can’t determine a minimal deployment package to generate, so it deploys everything.
Used for moving metadata to sandboxes and production orgs, not scratch orgs
sfdx force:mdapi:deploy
Same toolset as a changeset to deploy data, so it has the same requirements and features (rollback on error for example) and may run tests before allowing the data to be deployed. The data for this needs to be in MDAPI format (converted from DX via the force:source:convertcommand) as it will look at what is in the package.xml file to determine what is supposed to be deployed.
Since not everything can be put into a package yet, you may need to deploy some things via the MDAPI after you install a package
sfdx force:package:install
Installs a packaged version of something. This can be an appexchange package or a DX package (once that package is built using the force:package:version:create command. It needs a packageId (starts with 04t) or an alias from the local sfdx-project.json file as a parameter.
Since not everything can be put into a package yet, you may need to deploy some things via the MDAPI after you install a package
sfdx force:source:push
force:source:push only works on objects that are ‘trackable and in scratch orgs.
Things that are in the ‘Source Tracking’ column here
The source:deploy command works differently from source:push for scratch orgs. The source you deploy overwrites the corresponding metadata in your org, similar to running
The following elements can be defined in package.xml:
<fullName> contains the name of the server-side package. If no <fullName> exists, this is a client-side unpackagedpackage.
<types> contains the name of the metadata type (for example, CustomObject) and the named members (for example, myCustomObject__c) to be retrieved or deployed. You can add multiple <types> elements in a manifest file.
-- Valerie Belova
force:mdapi:deploysource:pushforce:mdapi:deploySource:push and source:retrieve are used to keep the org and sandbox up to date in terms of branching. Source:deploy and source:retrieve are used to actually push the metadata to another sandbox / environment.
<members> contains the fullName of the component, for example MyCustomObject__c. The listMetadata() call is useful for determining the fullName for components of a particular metadata type, if you want to retrieve an individual component.
For many metadata types, you can replace the value in members with the wildcard character * (asterisk) instead of listing each member separately. See the reference topic for a specific type to determine whether that type supports wildcards.
<name> contains the metadata type, for example CustomObject or Profile. There is one name defined for each metadata type in the directory. Any metadata type that extends Metadata is a valid value. The name that’s entered must match a metadata type that’s defined in the Metadata API WSDL.
<version> is the API version number that’s used when the .zip file is deployed or retrieved.
The manifest file defines the components that you’re trying to retrieve or deploy and the API version used for the deployment or retrieval.
To delete components before adding or updating other components, create a manifest file that’s named destructiveChangesPre.xml and include the components to delete.
When you're ready to move your code to the next step of the development process, it's important to have rigid testing decisions in place. Each environment is going to be associated with different types of testing. We also introduce a concept called Apex Testing. The programming language that Salesforce uses is called Apex, and any unit tests used will be written in Apex. The Apex testing framework makes it easy to test your Apex code. The Apex testing framework enables you to write and execute tests for your Apex classes and triggers on the Lightning Platform. Apex unit tests ensure high quality for your Apex code and let you meet requirements for deploying Apex.
We'll explore that further in this page.
Unit Tests and Apex Tests: Scratch Orgs
QA Feature Tests and Regression Tests: Dev-Pro Sandbox
Staging and user-acceptance testing: Partial-Full sandbox
Create Developer Environments
Develop using the web and local tools
Migrate changes to the integration environment
Authorize Dev Hub
Create Scratch Org
Install package / push source
75% of Apex statements must be executed (strive for 100% code coverage)
All Apex triggers must be called.
All Apex tests must execute without throwing any uncaught exceptions or exceeding governors.
Best Practices:
Arrange the data correctly, act on it, and assert to make sure your code is doing what it should be doing
Run tests as real user profiles
Sfdx force:user:create
Bob the Builder just developed a feature and he sends it to the develop branch. QA tester, Oscar, pulls into his environment, and runs the script that creates a scratch org and runs the apex tests. Next, he pushes the application to the Partial Copy Sandbox, and runs his regression and features tests in the sandbox. When Oscar feels like the application passed all his tests, he then pushes to the Full sandbox for UAT testing.
Tester Megan Goes into the Full Sandbox, and goes about UAT testing. She spins up some user accounts and works on using the application. When she feels like the application passes her user tests, she sends it off to the production org. This happens after the packages have been updated and installed.
Carl, QA tester, is testing the application when the apex code coverage reaches 70%. The application cannot be passed further, so he lets the developer know, and deletes his scratch org.
-- Valerie Belova
As we established early on, developing in Salesforce is fundamentally different from traditional custom application development. With Salesforce DX, the primary deployment asset is the package you create. It simplifies the whole deployment in that it contains everything your component needs to work in the production org; The package is based on the code in Git which is versioned and the package itself will also be versioned - no room for anything to get lost. This is all good stuff, but what does it mean for our developers? How do they navigate this new model? The purpose of this page is to outline how we anticipate handling this new paradigm and give some insight as to what parts of the process are automated and what will involve intervention from the developers and team leads.
This has been outlined here for more information:
At the start of any project (feature development), there should be a kick-off meeting where the developers get the chance to question the business analysts and project managers about the work being requested. There will be some high-level design needed to understand and assess what Salesforce DX package(s) will be affected by the business request and then an impact analysis and rough estimate can be given. Being as we are agile, we should then create a backlog of all of the work required to deliver the requested feature and prioritize the work items for our initial few sprints. As part of a "sprint 0" effort, there are a few "scaffolding" type steps we need to get in place before the work can begin - these are as follows:
Migrate changes to UAT environment
Perform user-acceptance testing
Migrate changes to the staging environment
Replicate production changes in the staging environment
Schedule the release
Delete Org
Create / Send Report
Exercise bulk trigger functionality
Can be called with more than one object-- aim for 10-20.
Aim to make sure it 'works' - not to test limits
Plan ahead Refresh your sandbox when it makes sense for the project
Build-in Assert methods into your test
System.Assert(expect, actual, 'friendly message')
Helps you find what went wrong in test failure
Use Test.startTest and Test.stopTest commands. Gives you a new set of governor limits, and runs any asynchronous code
Write Positive Tests
Write Negative Tests
User tests
Create a user with a given profile, and assign permissions to them
turn off seeAllData. This ensures you don't get random failures if data changes
Do not install LTS in a production org. Lightning tests don’t run in an isolated testing context, and DML operations you perform in a test are not rolled back when the test completes.
New SFDX Project Development:
Creation of the initial AzureDevOps repository for the SFDX project along with the required branches - this should probably be handled by your team lead, but the role here is completely up to you and your team.
Creation of initial Salesforce DX project for the component - this should be created by your team / project lead as the structure of the project and any dependencies should be considered from the start of the project and who would be better than your team lead to set that up.
Instructions for creating the SFDX Project:
Here is a good example of a modular App where the project packages are decomposed into their own Repos which empowers individual development team to manage the development of the packages independently. The overall project (Easy Spaces App) structure looks like this:
- a good template to use, instructions in link
Creation of initial CI/CD AzureDevOps pipeline - ideally, to help the work flow smoothly all members of the team should know what's involved in creating a pipeline to avoid bottlenecks, but a central role, primarily the team / project lead should handle this initial setup.
Detail steps to create new CI/CD pipeline outlined
All SFDX Project Development:
Creation of a feature branch off of development for the newly defined effort - your team lead or repository / project owner should handle the branch creation since they will also handle the merging & tagging of future production releases, so ensuring the branches are created correctly is important.
Data design session: Assuming we will be needing data for a given feature, we should first look into how we will need to structure the data to support it. Out of this session, we will deliver the following:
Data structure impact analysis: Impacts to existing data types & detail any new data types.
Initial data scripts to populate the data for test purposes.
NOTE: This may be deferred to a later sprint as we may not know all of the static / test data needed at the outset, but we should at least log the effort - as it will be needed to get the work to a test environment and this work should be captured.
Once we've done the initial setup to enable the work (code repository & branches, project scaffolding, and any relevant data scripts), you'll now have all you need in place to begin developing your SFDX project feature. To help illustrate the steps you'll need to do, as a developer, in your day-to-day routine - we'll walk you through a sample scenario below:
As you start your day, you open up Azure Boards and review the open tasks for your current sprint. You pick one off of the stack, read the details of what's required and make a personal branch off of the feature branch (because this should already exist as part of Sprint 0) for the current project your on (all of this information should be readily available from your team / project lead)
Once you have created your personal branch, you can begin development against the code & author your unit tests. You will write whatever classes you need and use the SFDX CLI to deploy your changes to your own personal scratch org to test the changes out.
Once your changes work properly in your scratch org, and your code is committed to your personal branch, your unit tests are written (to the agreed upon test coverage amount), have whatever static test data needed added to your data script, and think it's good enough to submit for testing - create a pull request to merge the changes in your personal branch into the feature branch.
Depending on your development teams policies are, either your team lead or your peer, will then review your pull request locally, test in their own personal scratch org, and if things check out, they'll merge your change into the Feature branch for others to now see - if there's an issue with your pull request, the team lead will comment on it in the pull request and provide direction as to how to correct any issues preventing the pull request from being merged; you'll then correct those and re-submit the pull request which should now be correct and ready to merge.
At a milestone to be determined between your development lead and QA, there will be a new package made for release to QA / Testing. The process of creating a package isn't terribly difficult, but to streamline the process we have created a to encapsulate the steps and provide a more consistent package creation process. The script can be invoked using command below to create the new version and deploy to development lead's scratch org:
$ cd/packagingDeployment.sh package MyScratchOrg
Once the new package version is created, it should be committed to the Package branch for the specific feature you are creating.
$ git checkout Package
$ git merge Develop
$ git push
From this point, the CI/CD pipeline in Azure DevOps will pick up the change in the package and use this package to deploy to our QA environment automatically.
As part of Continuous Integration (build), the AzureDevOps pipeline will run all of the unit tests and a security scan via PMD to ensure that what it is attempting to deploy to QA is not introducing any security risks or breaking any pre-existing (or new) unit tests so that we have a fair confidence that will not break the environment as part of this automated deployment - our goal here is to keep all environments, even QA, as stable as possible. You can prevent unexpected disruption to QA environment by introducing a Approval gate in Azure Pipelines to any specific QA user or a group of QAs.
Assuming the deployment runs successfully and the SFDX package is deployed to the QA org, testing of the new feature can now begin. From here, as issues are identified, the development & issue resolution cycle begins and is simply a repeat of the steps to get to this point (add feature / fix issue, commit code, submit & review pull request, merge, package, CI/CD automated build, QA test, etc.)
After we have formal sign off on the stability and completeness of the package released to QA, we may now migrate this package to UAT / Pre-Prod for final testing.
Similar to QA environment, a UAT approval gate can be introduced in Azure pipelines to any Specific User or a UAT User Group. Upon approval of UAT deployment, the CI/CD in Azure DevOps will proceed with UAT deployment.
To record a UAT milestone, a tag should be created by a team lead.
Finally, after we have formal sign off on the UAT / Pre-Prod environment, we move the package that is ready for production by first:
Creating a pull request from Package branch down into master branch. A Dev Lead will merge the pull request to master.
A release approval gate for Production exists in Azure CI/CD pipeline, a Release Manager kicks off the Production deployment by providing his/her approval. (our currently recommended trigger for firing off deployment - though it can be done via many other ways).
A sandbox is a copy of your production organization. You can create multiple copies of your organization in separate environments for different purposes such as development, testing, and training, without compromising the data and applications in your production organization. Different types of sandboxes have different refresh intervals, meaning they cannot be replaced for a set amount of days. It is important to be mindful of which sandbox is being used for which process. This guide explores basic sandbox information, and practices.
Note From QA Strat:
Unit Tests and Apex Tests: Scratch Orgs
Feature Tests and Regression Tests: Dev-Pro Sandbox
Staging and user-acceptance testing: Partial-Full sandbox
Developer Pro Sandboxes
Have a refresh interval of 1 day
1 GB limit
Only Metadata is copied
Partial Full Sandboxes
Have a refresh interval of 5 days
5 GB limit
Metadata and sample data is copied
Full Sandboxes
Have a refresh interval of 29 days
Same storage limit as production org
Metadata and all data is copied
Give Manage Sandbox permissions to a user to allow them create, refresh, activate, or delete a sandbox
Give Setup and Configuration permissions to a user to allow them to view a sandbox
Monitor the storage of each sandbox to ensure you don't throw too much into it
Setup -> Sandboxes in Quick Find
Click 'New Sandbox'
Enter a name (Such as 'QA'. The fewer characters the better
Setup -> Sandboxes in quick find -> sandbox templates
New Sandbox
Enter a name and description
Setup -> Sandboxes in quick find
Next to the name of sandboxes there should be a refresh link, click it
Review the name, values, and description
A sandbox can be cloned to save time. Instead of pulling source from the production org, you can replicate the data. Sandbox cloning simplifies having multiple concurrent streams of work in your application life cycle. You can set up a sandbox for each type of work, such as development, testing, and staging
Set up -> Sandboxes
Click Clone
Enter a Name
Salesforce's Sandbox Guide & Documentation:
$ git tag -a UAT-v0.1.0.9 -m "This is the latest UAT version"
$ git push --tags
CI/CD pipeline kicks of the production deployment.
As part of deployment, CI/CD promotes the SFDX package from Beta to Release.
Just like UAT, a milestone to Production should be recorded by tagging
$ git tag -a Prod-v0.1.0.9 -m "This is the latest Production version"
$ git push --tags
Make sure you don't refresh or delete a sandbox until you're sure that you're finished the work you have to do in it. Be mindful of the refresh intervals.
For a Partial Copy or Full sandbox, decide the type of data you want in the sandbox a. Partial: click next, select the template b. Full: click next, select how much data to include(or choose a template)
To run scripts after each create and refresh for this sandbox, specify the Apex class you previously created from the SandboxPostCopy interface.
Save
If you want your sandboxes activate immediately after refresh, select Auto Activate
Click Create
Please refer the below article on how to execute Dotnet Core Selenium Tests on Azure - Devops pipeline.
https://swimburger.net/blog/dotnet/how-to-run-net-core-selenium-ui-tests-on-azure-devops-pipelines
When moving data to sandboxes, and copying production data, it's important to hide / encrypt secure information of users, such as SSN, passwords, and anything else people could use maliciously.
As of now, masking data is limited with current toolsets, however, there are methods that are available and commonly used on the Salesforce marketplace, as well as 3rd party applications that can allow you more flexibility with how you want to manage secure data.
Use the SandboxPostCopyInterface and write your own apex class that implements method runApexClass(context). This can kick off a batch class to do the anonymization. allows you to run an Apex class as soon as the sandbox is refreshed. Use that class to run a batch class that makes your data encrypted.
Vendor appexchange solution like OwnBackup
Informatica has a product for managing sandboxes and cleaning data
Create permissions so non-admins can't see that stuff
On the standard user object, create an encrypted custom field to store the user's Social Security number. Set the field's Mask Type attribute to hide the first five digits of the social security number, and add field-level help to inform users of the required format. Then, create a validation rule that uses the REGEX() function to verify that the value of the custom field is in the correct format. Finally, create a new custom profile that allows a select group of users to the see the Social Security numbers unmasked.
For more information, visit
Create two new fields to hold the address and phone number of these specific contacts and then in the Field Level Security of those contacts set the fields to not visible for your standard user profile.
Benefits: these users won't be able to view the field through any means, even through reports or API tools.
Using the , you can mass update the records to remove any sensitive data. This is a manual process though, and it will need to be done each time the sandboxes are refreshed.
& Restrict other Salesforce users from seeing custom text fields you want to keep private. Only users with the permission “View Encrypted Data” can see data in encrypted custom text fields.
Managing packages in their sfdx-project.json file is a vital part of the development process. The process of involving dependencies, versioning, and installation can all become very confusing. This page breaks down the process in a digestible way, so that you can easily create, version, and install packages.
Package Version Numbers:
NEXT: increment the build number to the next available for the package
LATEST: assign the latest version of the package

By default, when referencing a certain Standard Object, field, or component type, you will generate a prerequisite dependency on your package
Package Installation Key:
ensures the security of the metadata within the package. Authorized Users are then provided the key
Provide -k (installation key) when running sfdx force:package:version:create. This key must be supplied when installing the package in an org.
Installation keys can be changed by running sfdx force:package:version:update
NameSpaces
Distinguishes your package and its contents from packages of other developers
Creating a "no namespace" package gives developers more control over how to organize and distribute parts of an application. Existing unpackaged metadata can be migrated only to an unlocked package with no namespace.
Generate
sfdx force:package:create
Make sure you specify the -name, -packagetype, -path, and -description.
specify feature and org preferences for the metadata in your sfdx-project.json
Release
sfdx force:package:version:create
Make sure you specify the -package, -installationkey, -wait, and any optional variables you wish to update
Use the "-b" flag to specify a build on a "logical branch". This flag allows you to keep experimental/development builds separate from the "main stream" builds that would be generated from your GIT MASTER branch
Install
sfdx force:package:install
Make sure you specify the package version by running sfdx:force:package:version:list to find its 0Ho ID.
Install packages in order of dependencies
Include the -tag option when you use the package:version:create and package:version:update commands. This option helps you keep your version-control system tags in sync with specific package versions.
Keep your sfdx-project.json populated with important information such as versions, name, build, aliases, etc. This is your source of truth for all packages.
use -wait when creating package versions. This helps you avoid the process of having to run sfdx force:version:report:create in order to view your package's status.
Don't version every little feature or change. Your org has a maximum number of package commands you can run.
Avoid namespaces if you aren't accustomed to them
Specify PermissionSets within your packages
Refer to the when running sfdx commands
Refer to the when using Scratch Org
Adopt a robust .forceignore file to avoid pulling down unwanted metadata
Have developers religiously refer to the to avoid packaging metadata this is incompatible with packaging.
Creating a pipeline automates many of the activities involved in development and helps to make processes more efficient and increases team throughput.
This section will explore setup and configuration leveraging Azure DevOps.
Guidance in this document provides details on some products that the team who developed are familiar with, but the approach would be the same regardless of the tools used.
Azure Pipelines - Continuous integration and continuous delivery (CI/CD) that works with any language, platform, and cloud.
- Unlimited cloud-hosted private Git and Team Foundation Version Control (TFVC) reports for your project.
- Work tracking with boards, backlogs, team dashboards, and custom reporting.
- All-in-one planned and exploratory testing solution.
Visual Studio Code - IDE used in tandem with Salesforce DX plugin to write edit, and deploy code into the repos.
In order for Salesforce to receive new automated headless deployment, below are a few settings:
Automate your Salesforce builds, test, and deployments with Azure Pipelines so you spend less time with the nuts and bolts and more time being creative.
Azure Pipelines is a fully featured continuous integration (CI) and continuous delivery (CD) service. It works with your preferred Git provider and can deploy to most major cloud services, which include Salesforce. Start with your code on GitHub, GitHub Enterprise Server, GitLab, Bitbucket Cloud, or Azure Repos. Then you can automate the build, testing, and deployment of your code to Salesforce.
To use Azure Pipelines, you need:
An organization in Azure DevOps.
To have your source code stored in a version control system.
Implementing CI and CD pipelines helps to ensure consistent and quality code that's readily available to users.
Azure Pipelines is a quick, easy, and safe way to automate building your projects and making them available to users.
Continuous integration is used to automate tests and builds for your SFDX project. CI helps to catch bugs or issues early in the development cycle, when they're easier and faster to fix. Items known as artifacts are produced from CI systems. They're used by the continuous delivery release pipelines to drive automatic deployments.
Continuous delivery is used to automatically deploy and test code in multiple stages to help drive quality. Continuous integration systems produce deployable artifacts, which includes infrastructure, apps and packages. Automated release pipelines consume these artifacts to release new versions and fixes to the target of your choice.
There are several reasons to use Azure Pipelines for your CI and CD solution. You can use it to:
Work with any language or platform.
Deploy to different types of targets at the same time.
Integrate with Salesforce deployments.
Resources
For SFDX development & deployment Questions and Discussions
Trailhead Module
This intent of this document is not to dictate or restrain how you write code, rather it’s intended to be a guide to help you write better code. The document starts with a short list of items to look for when conducting code reviews. The list below identifies, objectively, common programming faults and follies. The rest of this document goes into more detail on these “code smells” and provides some guidance as to how these problems can be avoided.
Rule of Thumb: “A code review should only judge the clarity and substance of the code – not the style.” It is important to note that we are not reviewing the style of coding, only whether that code violates best practices or potentially introduces performance or maintenance issues. To sum up, if the code can stand on its own (is understandable without explanation), there are no potential faults from performance or maintenance issues, and has proper unit tests - it should pass code review.
During code review
Critique the code, not the coder
Relate comments to standards, specs, performance etc.
Avoid “Why didn’t you” and replace with “What was the reasoning behind the deviation of standards here..”
Code formatting is important and style, to a certain extent, is as well, but style should not be the basis for rejecting otherwise readable and valid code.
Does the code implement the design?
Is the code easily understandable?
Is the code developed using a TDD approach, or at the very least have tests for code written / modified?
Reasons for Rejecting Code:
Unit test code coverage doesn’t cover the code under review.
Code doesn’t compile / doesn’t function as expected (smoke test).
Code that doesn’t follow:
Overview / Guidelines
Code should be reviewed before being made available to QA
During development
Static code analysis should be run to ensure:
Code Smells Detail - warnings, something that should be reviewed in detail
Consider using null object pattern instead of null checks
If there is a comment above a variable or method that does a better job explaining the functionality of the variable or method name, consider changing the name of the variable or method to be more descriptive.
NO magic numbers, magic strings,
Standardization: Follow standard naming and coding conventions
Apex
Javascript:
Leverage online tools for quickly checking code
Avoid anonymous callback functions, especially nested anonymous callback functions, (which are not testable) and instead call public functions on the return of asynchronous code.
use strict should be set
Items addressed by Human Code Review:
Questions to ask
Did the method you modified become easier or harder to maintain after you added your changes?
Unlocked Packages provide the ability to divide a Salesforce org into components that can be versioned and deployed independently. Unlocked packages include metadata (both code and configuration).
Unlocked Packages enable "Source Code as the Source of Truth"
There is a balance that needs to be defined between making package sizes small enough that changes can move quickly through the development process, but not so small that any change requires multiple packages to need to change.
The following guidance details an approach to structure packages in a manner that best strikes this balance.
Breaking up your "Happy Soup" The following provides guidance on how to organize the org into SFDX Packages:
Visual Studio Code (VSCode) is a free, cross-platform code editor with a strong plug-in community which extends its capabilities. Salesforce has created plug-ins to work with VSCode and has become the preferred editor for editing code with SFDX.
Visual Studio Code can be used by both developers and QA staff alike.
GIT
The from GitHub is a great resource for setting up and configuring GIT
The codebase of the Salesforce org should be broken into multiple projects, this allows each unlocked package to be worked on independently.
Project Configuration
Each unlocked package "project" needs to contain its own sfdx-project.json file which defines all the details about an unlocked package.
Project Details:
Filesystem Structure
Common interfaces
Standard Salesforce SObjects
object-level metadata
UI Libraries (including common Lightning Components)
Custom objects
Page layouts
Custom list views
Custom or standard fields
A package can be dependent on one or more packages. Normally, the more components you include in later packages, the more packages you would have to reference. For example, if you have a package whose code references 3 other packages, those would have to be listed as dependencies. In these types of packages, you can have components such as:
Apex Services
Shared Lightning Components
Custom Page Templates
Theme images
Tabs
Permission Sets
A group of related code and customization
Can be tested independently from other components in your org
Able to be released independently
Source components can only live In one project at a time
Object-level metadata should be kept in a base class.
Make sure your base class doesn’t account for other shared metadata
You don’t have to break up data without a reason
If there are deeply intertwined dependencies, include those together.
If functionality would be useful to future apps or other parts of the org, maybe consider moving the metadata elsewhere
There is no objectively-right method for breaking up metadata
Very subjective, should match working styles of team
Things that don't work
Shared metadata
Shared Objects
Note: Use dependencies instead, and reference back to the metadata and objects.
For Questions and Collaboration: Chatter Page
Salesforce Trailhead:
-- Valerie Belova
Use tested code from CI process.
Run tests continually.
Integrate with GitHub, Azure Repos or Bitbucket.
Work with open-source projects.
Pre-defined environment variable, other options are variable groups and azure key vault
Alternatively you can save a template for build and release pipeline to streamline the deployment process.
Once CI-CD pipeline is ready you can export it
you can add approvers at each stage of deployment
Important!
Be sure to copy down the consumer key—you’ll use it later
Continuous integration (CI)
Continuous delivery (CD)
Increase code coverage.
Automatically deploy code to production.
Build faster by splitting test and build runs.
Ensure deployment targets have latest code.
Automatically ensure you don't ship broken code.
Magic numbers / strings
Object instantiation
Duplicate code
Combinatorial explosion
Large classes
Type names embedded in names
Uncommunicative Names
Code adheres to recognized standards and coding styles
Doesn’t introduce security issues
Developer should strive to produce code that meets the business need and is easy to maintain
Developed using a TDD approach, or at the very least have tests for code written
Instead try Enums, constant numbers/strings with meaningful names.
NO commented-out code
Instead write more descriptive check-in comments when removing
If you see the word new (constructing an object)
Instead declare dependencies through constructor arguments that are of the type's interface
Coding should in most cases be done against interfaces
If you need to scroll to see the entire contents of a procedure or method:
It is likely too complex and may benefit from being broken down into smaller pieces.
Specific-Case Code Smells:
Duplicate Code: Don’t repeat yourself; if you are doing the same thing in more than one spot, extract it to a method.
Combinatorial Explosion: When you see a lot of code doing almost the same thing, it may be a case of combinatorial explosion, a form of repeating code. Consider refactoring methods to interfaces or make use of generics.
Long Parameter List: If you see a method that takes 4 or more arguments it may be too complex - and it will definitely prove difficult to test. Aim for smaller functions that take 0-2 arguments, if possible, OR consider combining the parameter list into an object.
Large Class: A bunch of smaller more focused classes are preferable to a large and complex single class. If you encounter a large class consider refactoring it out into smaller more easily testable classes.
Types Embedded in Names: Don’t put the type of the variable in the name since the variable’s name will need to change if its type changes.
Uncommunicative Name: Methods should describe what they do in their name, variable names should describe the value they hold. If the method name says it does one thing, but appears to do many things, that can mislead you and cause bugs. When naming a method, keep it descriptive, if the name is too long, it’s likely doing too much.
Additional Resources:
Apex Enterprise Patterns:
Variable Declaration
Check to see if variable declaration is inline with variable hoisting
Don'ts
Do's
Long parameter lists (>3 params)
Code should follow SOLID principles
Null checks
Unnecessary comments / commented-out code
Mac Users - You may want to consider connecting with SSH and adding SSH key to the SSH Agent
Getting a workstation setup with VSCode and configured for Salesforce development is a straightforward approach, the steps below outline what is needed to perform regardless if the developer or quality assurance engineer is running on a PC or a Mac.
Download and Install Visual Studio Code
Java 11 Platform, Standard Edition Development Kit Some features in Salesforce Extensions for VS Code depend upon Java (Standard Edition Development Kit (JDK))
The is a recommended alternative to Oracle's Java which carries licensing fees.
Install the Salesforce
Install the official into Visual Studio Code.
Configure Settings in Visual Studio Code to point to the JVM
Open Settings, Navigate to User
Select Salesforce Apex Configuration
Connect VS Code to Azure DevOps GIT Repos
Learn DX
You may want to follow this trail to get familiar with Salesforce DX
Salesforce needs to be configured to enable SFDX. This is a one-time setup for the Developer org.
Setup Dev Hub and G2P in your Salesforce edition
Navigate to Setup > Settings > Development > Dev Hub
Move the slider to enable Dev Hub and G2P Packaging
From a command prompt in Visual Studio Code issue sfdx force:auth:web:login to log into the Dev Hub using the CLI, which will authorize you to create scratch orgs.
SonarLint - Provides realtime feedback on writing better code.
Connects with SonarCloud (free for public projects ~$10/mo for most Salesforce projects)
- Keeps code formatting consistent
- For building Automated UI Tests with Selenium
- Helps with working with XML Files
Automatically push code to org when saving:
salesforcedx-vscode-core.push-or-deploy-on-save.enabled to true.
Trailhead Module:
-- Valerie Belova
SFDX Plugins
Namespaces
Loading Sequence
When you create a new scratch org, you need to install all of the dependencies into the scratch org first, then you push the data for the package. DX will recognize that it only needs to track the data of a certain package with the push/pull since the other data are part of other packages. This does require that the other packages are actually built into packages before working on this (using the force:package:version:create command).
If for example, you are a developer in Repo2, and you're working on Package2 for the project. Your Package2 could be dependent on Package1, which is housed in a different repo, and controlled by a different developer.
You simply need to tell the Package2 that it depends on the Package1 in the sfdx-project.json file that defines the package2.
Create Package2 in its project using sfdx:force:package:create command, and specify its path and settings assuming all of the code exists. List Package1 as a dependency.
If you attempt to version, you'll get the following error: Package1 isn't defined in the sfdx-proect.json. Add it to the packageDirectories section and add the alias to packageAliases with its 0Ho ID.
In the sfdx-project.json, create a Packagedirectory for Package1. Specify the path as a dummy path (such as force-app). Fill the versionName, and versionNumber fields with information found in step 2.
Navigate to your org's "Installed Packages" list, and find Package1. Jot down the versionName and versionNumber, and fill the those fields in the sfdx-project.json of Package1 Project.
Run sfdx:force:package:list to list all of the packages in your org from the CLI. Copy down the name, and '0Ho' ID of Package2, and enter it as a field in packageAliases.
You should now be able version your Package2 using sfdx:force:package:version:create with its dependencies linked to Package1.
Even within a package, each programmer would create a branch of the VCS and then work on a section of code in their own scratch or. When they are ready, they can check the code in, and then merge it with any other changes (easier if each developer is working in different classes). The same thing applies to workflows, process builder, page layouts, etc. Create a branch, work in a scratch org, check in changes, merge, and repeat.
It's important to create a 'base' package that contains all of the things that will need to be shared across the other parts and the dependent packages on top of that(Package1). Each subsequent package would have its own repository. In the base package would be any custom objects that are needed and any custom fields for standard objects that relate to the widgets. Also, include permission sets that provide access to the data. Then you can build the Package2 and Package3 packages and define that they depend on the base package (since that is where the data is defined). In the Package2 and Package3, you would add any code, workflows, lightning applications, components, etc that are needed to provide service for widgets. This allows you to work on Package2 and Package3 independently and install/removed/update each in production as needed without working about stepping on each other's toes.
The great thing about Salesforce DX, is that packages are released independently, and are stored in the Org. Packages can be accessed and used by developers that don't have access to the source code.
-- Valerie Belova
It is desirable to segment the codebase into business domains that are not interdependent so that each business domain can evolve at its own rate and change can be isolated and changes moved to production independently.
In a microservices driven architecture there are significant advantages of ensuring that each microservice own the data that it interacts with and that no other microservice interacts with another's data directly. The net result allows microservice teams to evolve their codebase and underlying data structures/data stores with confidence that it will not impact any other part of the system.
Resources:
Eric Evans -
Andrew Fawcett -
Resources:
Martin Fowler -
Andrew Fawcett -
To help ensure queries are optimized, organized and reusable it may be important to implement a selector layer.
Resources:
Andrew Fawcett - Video -
Andrew Fawcett -
To minimize impact to production users of new features and to allow for better understanding of user usage it may desirable to employ canary releases and AB testing functionality. Canary releases allow releasing into production functionality but control the audience impacted, for example starting with production test accounts to allow QA to validate functionality in production, then to a smaller portion of the userbase and then finally to the entire userbase. We desire AB testing to allow the business to perform trials of functionality to determine if yields the expected outcome.
Resources:
Martin Fowler -
Salesforce Maximizer Blog:
Andrew Fawcett suggests using a factory pattern to resolve services in Salesforce, it would be ideal have Service Registry / Discovery implementation. Developing an approahc resolving services would be beneficial. (i.e. ideally not having a direct reference between a visual force or lightning component controller and the service(s) it consumes) Having the ability to switch out implementations, or have multiple implementations with different functionality running in parallel is desired (for example speech to text with both Salesforce Eintstein and Amazon services)
Resources:
Service Registry -
Providing runtime analytics to SREs at the org enables detailed behavior understanding.
Resources:
Event Monitoring - '
Financial Times Approach -
Using with LogStash - Plugin -
Along with creating a repository for each package, an sfdx project should also be created for each package. The sfdx project along with the repository will live in the same directory. It's important to name the project after the particular package or feature that the team will be working on.
In VSCode, navigate to the top row, and select 'Terminal'. A new terminal window should appear at the bottom portion of the screen.
Type in the command sfdx force:project:create --projectname "Name" --manifest This will populate the directory with sfdx files
Authorize your provided org, using sfdx:force:auth:web:login --setdefaultdevhubusername --setalias "Alias"
--setalias make is easier to access your org when running commands that push source to your org
--setdefaultusername makes it so that org is the default org. If you don't specify an org when working with files or packages, they will automatically be pushed to the default org.
This json file will contain the instructions for scratch org creation. Normally, when you've authenticated an org, and you're ready to start developing you'll spin up a scratch org, push data into the org, and start developing. You can include thigs like edition, name, and features
Edition—The Salesforce edition of the scratch org, such as Developer, Enterprise, Group, or Professional
Add-on features—Functionality that is not included by default in an edition, such as multi-currency.
Settings—Org and feature settings used to configure Salesforce products, such as Chatter and Communities.
The First Scratch Org
SFDX development is performed in a Scratch Org which is an empty local Salesforce environment.
Create a Scratch Org from project-scratch-def.json
sfdx force:org:create --definitionfile "config/project-scratch-def.json" --setalias "Alias"
sfdx force:source:push to push the project source into the scratch org
sfdx force:package:install --package
Unlike a sandbox, the Scratch Org will have no data in it when it is created. To ensure data is available in a Scratch Org to support the development and testing efforts data will have to be scripted in, fortunately, Salesforce provides capabilities to support this.
This is the basis for starting up a project. Scratch org management will be explored later in the wiki.
This is the json file that describes all of the packages within your project. It's a useful place to refer to the packages in your org. Although, when you first create the project, this json file will only contain the force-app path. It's important to jot down the '0ho' IDs of packages in this file.
To find package names and IDs, run sfdx:force:package:list
Note: for more information about parameters you can specify in your sfdx-project.json file, click
Prerequisites:
with installed, to both Azure DevOps and your ScratchOrg.
A SonarCloud account (Free for public projects / ~$10mo for most Salesforce projects) - with a project set up which will be used for the SFDX code analysis, note the projectKey as it will be used in step 14.
Configuration Process:
Note: For more information about the scratch org definition file: Visit Here
sfdx force:user:permset: assign ---permsetname "Permission" allows the scratch org to access data that is limited to the hub.
sfdx force:org:open to open up the project in your browser.

Install the SonarLint Extension into VSCode, and restart VSCode
Open your VSCode project related to your ScratchOrg
Visit SonarCloud and log in using the Azure DevOps button.
Visit
Under the section titled Generate Tokens, enter vscode and click the Generate button.
You will get a new token, copy the token value secure location we will use it later and you will not be able to retrieve it once it is generated.
Open Visual Studio Code, and navigate to the setting section
On Windows/Linux - File > Preferences > Settings
On macOS - Code > Preferences > Settings
Select User Settings and Search for SonarLint
Ensure that you select User directly under the search box so that you are configuring user settings.
Pick any of the settings and click **Edit in settings.json
Paste the following into the settings.json file
Replace the <<YOUR VSCODE TOKEN GOES HERE>> with the token you created earlier.
Replace the <<YOUR COMPANY NAME>> with your organization key
You can look up the organization key on the .
Replace the <<YOUR PROJECT KEY>> with your project key.
You can look up the project key under Administration > Projects Management on your organization's page.
You will also likely want to set the Sonarlint > LS: Java Home to the follow the path to your JDK in the same manner you had do to when installing
Restart VSCode and reopen your VSCode Project related to your ScratchOrg
The following is a sample settings.json file for reference:
{
    "sonarlint.connectedMode.connections.sonarcloud": [
        {
          "organizationKey": "ecfmg",
          "token": "b33e974....76331859"
        }
      ],
    "sonarlint.connectedMode.project": {
        "projectKey": "sfdc"
      },
    "salesforcedx-vscode-apex.java.home": "/Library/Java/JavaVirtualMachines/adoptopenjdk-11.jdk/Contents/Home",
    "sonarlint.ls.javaHome": "/Library/Java/JavaVirtualMachines/adoptopenjdk-11.jdk/Contents/Home"
}Shift-left testing is an approach to software testing and system testing in which testing is performed earlier in the life-cycle (i.e., moved left on the project timeline). It is the first half of the maxim "Test early and often."
Shift-left testing is important because it helps to prevent the following types of harm due to late testing:
Testers may be less involved in initial planning, often resulting in insufficient resources being allocated to testing.
Many requirements, architecture, and design defects are not uncovered and fixed until after significant effort has been wasted on their implementation.
Debugging (including identifying, localizing, fixing, and regression testing defects) becomes harder as more software is produced and integrated.
Encapsulation (object-oriented programming) makes it harder to perform white box testing and to achieve high levels of code coverage during testing.
There is less time to fix defects found by testing, thereby increasing the likelihood that they will be postponed until later increments or versions of the system, which creates a “bow wave” of technical debt that can sink projects if it grows too large.
As illustrated in the following figure, Agile and DevOps projects have numerous short duration Vs (sprints) in lieu of a single or small number of V as in the previous two examples of shift-left testing. These small Vs would also be modified if one or more early sprints are used to block out the basic requirements and architecture or if test-first and Test Driven Development (TDD) are being performed. The shift-left occurs because the types of testing on the right sides of the earliest of these tiny Vs are to the left of the corresponding types of testing on right side of the larger V(s) they replace. While the following figure appears remarkably the same for Agile and DevOps, Agile testing is typically restricted to developmental testing and does not include operational testing, which occurs once the system is placed into operation. The transition to Agile/DevOps shift-left testing is currently popular and ongoing.
Please refer the below article on how to create extent reports on HTML format to report the test automation execution results using selenium on Dotnet core platform.
Page Object Model is a Design Pattern which has become popular in Selenium Test Automation. It is widely used design pattern in Selenium for enhancing test maintenance and reducing code duplication. Page object model (POM) can be used in any kind of framework such as modular, data-driven, keyword driven, hybrid framework etc. A page object is an object-oriented class that serves as an interface to a page of your Application Under Test(AUT). The tests then use the methods of this page object class whenever they need to interact with the User Interface (UI) of that page. The benefit is that if the UI changes for the page, the tests themselves don’t need to change, only the code within the page object needs to change. Subsequently, all changes to support that new UI is located in one place.
Advantages of Page Object Model
The advantages of page object model can be listed as:
Code re-usability
"sonarlint.connectedMode.connections.sonarcloud": [
    {
      "organizationKey": "<<YOUR COMPANY NAME>>",
      "token": "<<YOUR VSCODE TOKEN GOES HERE>>"
    }
  ],
"sonarlint.connectedMode.project": {
    "projectKey": "<<YOUR PROJECT KEY>>"
},Code maintainability – There is a clean separation between test code and page specific code such as locators and layout which becomes very easy to maintain code. Code changes only on Page Object Classes when a UI change occurs. It enhances test maintenance and reduces code duplication.
Object Repository – Each page will be defined as a java class. All the fields in the page will be defined in an interface as members. The class will then implement the interface.
Readability – Improves readability due to clean separation between test code and page specific code
This approach is called Page Object Model(POM). It helps make the code more readable, maintainable, and reusable.
This figure illustrates the page pattern model using Selenium:


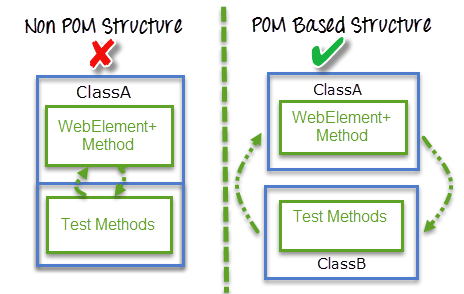

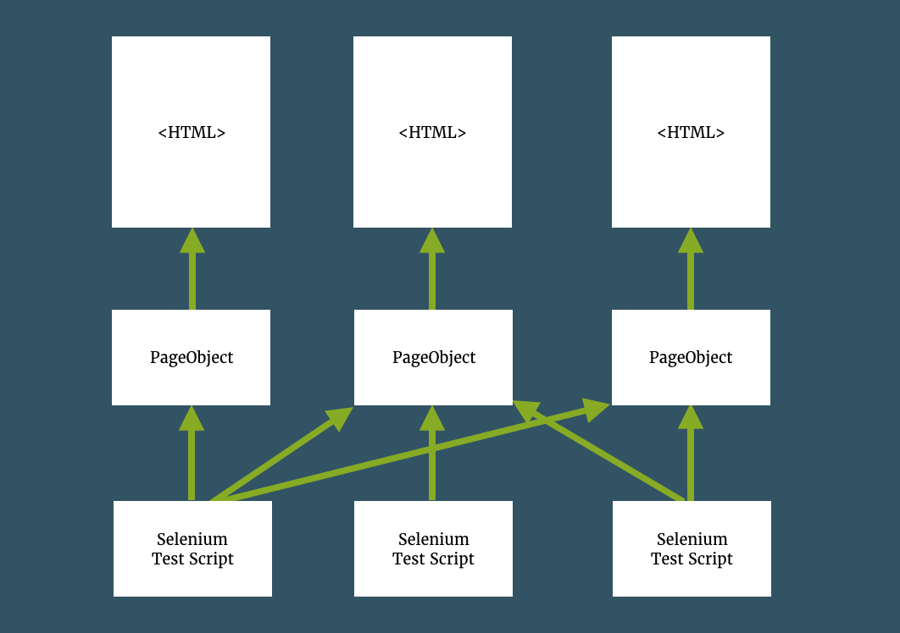